Screenshots:
If you don't want to see a complete user manual at this time, other options are:
Description:
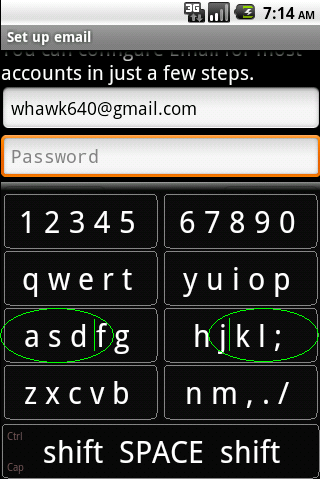 This image shows the proper thumb position indicated by green ovals. Touch typists will recognize that this is the
home row we were all taught about in typing class. SlydeBoard is a full QWERTY keyboard with just 9 buttons! It is easier to learn than most other slide keyboards, because it is the same as your computer's keyboard.
It really is designed as a touch-type keyboard for your thumbs.
This image shows the proper thumb position indicated by green ovals. Touch typists will recognize that this is the
home row we were all taught about in typing class. SlydeBoard is a full QWERTY keyboard with just 9 buttons! It is easier to learn than most other slide keyboards, because it is the same as your computer's keyboard.
It really is designed as a touch-type keyboard for your thumbs.
Though only 5 keys are shown on each button, there are actually many more, up to 11 per button. These five are the most common though, and you'll use them all the time.
The buttons correspond to rows on the keyboard and which hand you would type the letter with. Since there are very few buttons, they are as large as possible, and designed for thumbs. Just like on a laptop keyboard, use the left thumb for keys typed with the left hand, and the right thumb for keys typed with the right hand. (I can type the world-record texting sentence in (UPDATE!) 0 minutes, 55 seconds, and I'm still getting faster!)
All control letters (CTRL+A -- CTRL+Z) as well as CTRL+] (for telnet) have been tested.
ESCAPE works (a must for vi), as does TAB, CAPS LOCK, and the arrow keys.
EMACS users and VI users will find these features awesome!Here's a quick bit of training on the app. I think you'll figure out how to type all letters and numbers relatively quickly (tap for center, tap and slide a little for next key, tap and slide a lot for far keys). If you don't get it right away, just hold your finger (or thumb) down on the button and move it slowly around to see how the hot zones work. A large character will appear showing you what you'll actually hit if you release the button. There's a red dot that shows you where you're currently touching, and small characters that show you where to move to reach particular keys.
80% of your time will be spent on the home row. (Sliding left and right only) Therefore, in the rare event of a screw-up, haptic feedback can help. If your device has haptic feedback, it will rumble slightly whenever you slide up or down from the main row.
BACKSPACE:Just slide straight up on ANY key to backspace.
ENTER:Just slide straight down on ANY key to enter. (NOTE: This will send your text message, begin your internet search, etc. If you need to get out without doing that, try the ESCAPE key.)
ESCAPE: Start on the key labeled (1 2 3 4 5) and slide rapidly up, then left. (Works when shifted too)
Left Tick (`): Start on the key labeled (1 2 3 4 5) and slide rapidly up, then right. (~ when shifted)
MINUS (-): Start on the key labeled (6 7 8 9 0) and slide rapidly up, then left. (Underscore when shifted)
EQUAL (=): Start on the key labeled (6 7 8 9 0) and slide rapidly up, then right. (Plus when shifted)
TAB: Start on the key labeled (q w e r t) and slide rapidly up, then left. (Works when shifted too)
L BRACKET ([): Start on the key labeled (y u i o p) and slide rapidly up, then left. (Curly when shifted)
R BRACKET (]): Start on the key labeled (y u i o p) and slide rapidly up, then right. (Curly when shifted)
CAPS LOCK: Start on the key labeled (a s d f g) and slide rapidly up, then left. (Works when shifted too)
CTRL: Start on the space bar labeled (shift SPACE shift) and slide rapidly up, then left. (You'll see an indicator come on)
Single Quote ('): Start on the key labeled (h j k l ;) and slide rapidly up, then left. (" when shifted)
BACKSLASH (\): Start on the key labeled (h j k l ;) and slide rapidly up, then right. (| when shifted)
DELETE: Start on the key labeled (n m , . /) and slide rapidly up, then right.
LEFT ARROW: Start on any key on the left (1, q, a or z) and slide rapidly down, then left.
RIGHT ARROW: Start on any key on the left (1, q, a or z) and slide rapidly down, then right.
UP ARROW: Start on any key on the right (6, y, h or n) and slide rapidly down, then left.
DOWN ARROW: Start on any key on the right (6, y, h or n) and slide rapidly down, then right.
£: (Currency) Start shifted on key labeled (1 2 3 4 5) and slide rapidly down then left
€: (Currency) Start shifted on key labeled (1 2 3 4 5) and slide rapidly down then right
ñ: Start on the key labeled (n m , . /) and slide rapidly up, then left (Capital when shifted)
Since version 1.5, SlydeBoard is very configurable and will work on almost any device. To change SlydeBoard settings, go to the phone or tablet's settings menu. Look for 'Locale & Text' or 'Language & Keyboard' depending on the Android Version. There will be a menu option called 'SlydeBoard Settings'. In that menu you can:
Changing the full-screen method of the phone may be useful on some small screens, though the default should be fine on most devices.
Request features or report issues to whawk640. If you like it, please leave a rating and/or a comment in the Android Market and Tell a Friend!
Troubleshooting tips:
Happy Texting and Mobile Computing!
ChangeLog:v3.0: (2011/06/01)
v2.0: (2010/12/17)
v1.5.2: (2010/12/12)
v1.5.1: (2010/12/10)
v1.5: (2010/12/9)
v1.4: (2010/11/15)
v1.3: (2010/10/25)
v1.2: (2010/09/10)
v1.1: